
Nowadays, sending e-mail is an important requirement in most applications. When it comes to sending emails in Nodejs applications, nodemailer is the most popular package for this purpose.
In this article, we will cover the steps to send emails in Nodejs using the Nodemailer package.
What is Nodemailer?
Nodemailer is a library used for sending emails for Node.js-based applications. This library is capable of sending emails via SMTP (Simple Mail Transfer Protocol).
Nodemailer is also flexible with the ability to connect to various email service providers (e.g. Gmail, Yahoo, Outlook). It also offers advanced emailing features with the ability to add HTML content, send attachments, and customize various email options.
Now let’s take a look at the steps required to send an email from a NodeJS application, one by one.
Prerequisites
Before you begin, make sure you have the following prerequisites installed:
- Node.js: You can download and install it from the official Node.js website (https://nodejs.org/).
Setting Up the Project
Initialize a Node.js project:
Open your terminal and navigate to the directory where you want to create your project. Then, run the following commands:
mkdir nodemailer-demo
cd nodemailer-demo
npm init -yInstall Nodemailer:
To install Nodemailer, execute the following command in your terminal:
npm install nodemailerHow To Send Email In Nodejs With Nodemailer
Import Nodemailer
To get started, create a new Node.js project and import the Nodemailer library:
const nodemailer = require('nodemailer');Create A Email Transporter
Nodemailer uses a transporter to define how emails should be sent. So, you need to configure the Simple Mail Transfer Protocol (SMTP) transport that Nodemailer will use to send emails. This includes providing your email service’s SMTP server details:
const nodemailer = require('nodemailer');

let transporter = nodemailer.createTransport({
    host: 'smtp.gmail.com',
    port: 587,
    secure: false,
    auth: {
        user: 'example@gmail.com',
        pass: 'password'
    }
});
In the example above, we created a transporter object using the Gmail SMTP server. We specify the email credentials, including the username and password. If you want to set a different host such as yahoo and outlook, you can use the following values of the hosts:
 gmail: "smtp.gmail.com"
 yahoo: "smtp.mail.yahoo.com"
 outlook: "smtp.office365.com"
It is important to note that if you are using a Gmail account as your host, you will need to create an app password through your Google account. After generating the app password, you can substitute it for your regular password in the corresponding field.
How to Generate an App Password For Gmail
An app password is a unique, randomly generated password that allows you to sign in to your Gmail account from apps or devices that don’t support Google’s two-step verification process directly
Steps to Generate a Gmail App Password
Follow these steps to generate a Gmail app password for secure access to your account:
Step 1: Sign In to Your Google Account
Open your preferred web browser and go to the Google Account page. Sign in with the Gmail account you want to generate an app password for.
Step 2: Access Security Settings
Once you’re logged in, navigate to the “Security” section of your Google Account. This can usually be found on the left-hand side of the page.
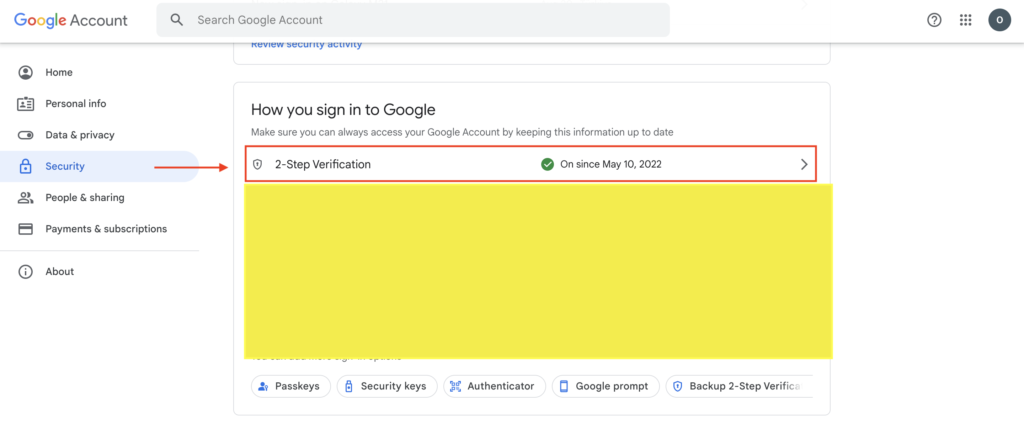
Step 3: 2-Step Verification
In the Security section, you’ll find an option called “2- Step Verification.” Click on this option to proceed.
Step 4: Generate App Password
Go to the section App passwords in page below
Step 5: Generate
After selecting the app, click the “Generate” button. Google will now generate a unique app password for the selected app and device. This password is a one-time display, so make sure to copy it or keep it in a safe place.
Step 7: Revoke App Password
If you no longer use the app or device, or if you suspect a security breach, you can revoke the app password. Go back to the “App passwords” section in your Google Account settings, find the app password you want to revoke, and click the “Revoke” button.

Send Email Through Transporter
Once you have set up the transporter, you can use it to send email in nodejs application. To send an email, we use the sendMail method, which takes a message object that contains the email details.
let message = {
    from: 'example@gmail.com',
    to: 'recipient@example.com',
    subject: 'Test Email',
    text: 'Hello, this is a test email!'
};

transporter.sendMail(message, (err, info) => {
    if (err) {
        console.log(err);
    } else {
        console.log('Email sent: ' + info.response);
    }
});
In the example above, we create a message object that specifies the sender, recipient, subject and body of the email. We then call the sendMail method using the transporter object we have created. After sending message, the callback function will log any errors or the email response.
Adding Attachments
Nodemailer also allows us to send email with attachments such as txt, pdf files or images. To send an email with an attachment, you first need to create a transporter object, as we did above, then, a message object that includes the attachment.
let message = {
    from: 'example@gmail.com',
    to: 'recipient@example.com',
    subject: 'Test Email with Attachment',
    text: 'Hello, this is a test email with an attachment!',
    attachments: [
        {
      filename: `file.pdf`,
      path: path/to/file,
      cid: `index`,
        }
    ]
};

transporter.sendMail(message, (err, info) => {
    if (err) {
        console.log(err);
    } else {
        console.log('Email sent: ' + info.response);
    }
});
In the example above, we create a message object that includes an attachment. The attachment is an object that specifies the filename and content of the attachment. Nodemailer also supports multiple attachments so you can add new files to the attachments array.
Sending HTML Content
Nodemailer allows us to send email with HTML content, which is useful for creating rich, formatted email messages. To send an email with HTML content, you simply need to include the HTML content in the message object.
let message = {
    from: 'example@gmail.com',
    to: 'recipient@example.com',
    subject: 'Test Email with HTML Content',
    html: '<h1>Hello, this is a test email with HTML content!</h1>'
};

transporter.sendMail(message, (err, info) => {
    if (err) {
        console.log(err);
    } else {
        console.log('Email sent: ' + info.response);
    }
});
In the example above, we create a message object that includes the HTML content for the email message. The HTML content is included as a string in the html property of the message object.
Conclusion
Sending emails in Node.js using Nodemailer is a straightforward process that allows you to send both plain text and HTML emails with attachments. By configuring the transporter and providing the necessary email options, you can easily integrate email sending capabilities into your Nodejs applications.
If you want to discover more about Nodejs, you can take a look at the following articles:
- Axios With NodeJs
- Nodejs Get File Information (size, modification time)
- Web Scraping In Nodejs Using Cheerio
Thank you for reading.